Friday, August 14, 2015

Picky Eater Sushi

Sushi.  I first tried it in high school.  After getting me on the anime bandwagon, a couple of friends brought me out to try it.  It...did not go well.  I found a roll that didn't involve raw fish, but then I discovered that the nori it was wrapped in...well, seaweed just wasn't for me.  So I put it in my 'tried it' bucket and stuck to rice and miso soup whenever I found myself on future sushi outings.

More recently though, I found myself wanting to try it again.  Mostly because my husband enjoys it, meaning we find ourselves at sushi establishments from time to time.  And though I have found more things to eat, I can't help but feel drawn to sushi.  It's got so much visual appeal.

But some problems still remain.  Raw fish.  Tuna and salmon aren't too bad, but I really shouldn't eat it to often for dietary reasons.  Nori.  I can selectively manage it, but seaweed still just isn't my thing.  Also, price.  It can get expensive quickly.

So how to solve these issues?  Why, make it myself of course.  I can pick my fillings, eliminate the nori, and save quite a bit a money.  I did the math at one point, comparing the price of my ingredients for an equivalent role.  It was about a third of the price.  Bingo.


So, once the raw fish is eliminated, sushi is pretty simple to make.  Gather your rice and fillings, grab your roller and some plastic wrap, and grab some water with a splash of rice vinegar, and you're ready.


First, rice.  Sushi rice.  I have a Japanese market nearby.  I went in, asked what they recommended, and went on my way.  Now preparing sushi rice is much like preparing regular rice.  You don't need a steamer.  You do need to rinse the rice thoroughly, let it soak, use the right ratios, and let it cool to room temperature.

Now for the rice recipe, on Youtube there is this awesome channel.  JapaneseCooking101 has a simple sushi rice recipe.  However, I have some added tips learned through trial and error.  First, when you soak the rice, despite what some websites might say, I wouldn't soak it any more than an hour.  It leads to mushy rice.  Thirty minutes is best.  

Second when cooling it, do NOT put it in the refrigerator to speed up the process.  This will cause condensation, which is not good for sushi.  Fan it when you remove it from the pot, stir it once in a while to release additional heat, and if you really want cooling to go more quickly, point a fan at it.

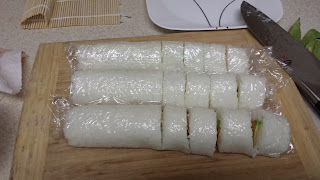
So once cooled, it's time to lay it out.  Since I'm skipping the nori, I use a sheet of plastic wrap on top of my roller for forming.  Press it into a rectangle, making it a little more than a quarter inch thick.


Next, fillings.  I've used cucumber, avocado, grilled chicken, steak, cream cheese.  This round was avocado and sweet potato.  Cut your filling into thin strips, and place on the rice as seen above.


Time to roll.  It takes a little practice, but it's not too difficult.  Starting with fewer fillings helps.  Use your fingers to hold it in place as you start the roll.  Make sure you pull away the plastic wrap after you start it so it doesn't end up included in the roll.  There are many videos on rolling.  Watching a couple will give you a good idea on technique.


Once rolled, slice it up.  This is probably the trickiest part just because the rice tends to stick to the knife.  I use a towel soaked with rice vinegar to clean it in between cuts.

Packed up for lunch at work!

Finally, enjoy!

Saturday, August 8, 2015

Recipe: Irish Beef Stew


Stew.  Stew was a favorite of mine growing up.  Typically we'd make it with venison.  Sometimes I still do, if opportunity presents itself.  But this time, I'm going with beef.  Now this recipe is based off the Guinness Beef Stew recipe from the Irish Cooking Bible.  My parents got it for my husband as a Christmas gift last year.  He unwraps it, turns to me and says "Oooh, look at the new stuff you can cook for me!"  Thanks, Mom and Dad.

Luckily, I particularly enjoy cooking for my husband, so it really was a perfect gift.  Now for this recipe, I highly recommend using a dutch oven.  You could alter the method to cook it without one, but it really is a fantastic item to have.  My favorite thing about it?  It really enables 'one pot meal' cooking.  Let's get started.  

Browning is the result of about a gazillion uses.  I've tried everything to get rid of it, but I've come to accept it.

First I diced up an onion.  I would say this is more like a two onion recipe, but I have only barely begun to eat the things.  Usually this is where I substitute for onion powder, but I discovered recently that as long as they are cooked to the point of no longer having any particular texture, I can eat them.  But seriously, if they aren't melting in my mouth, you won't find them in my recipes.  We've been enemies for a long time, and I don't see us being buddies any time soon.

Anyways, cook them in some oil until they start to soften, and then it's time for meat!


For stews, I typically just buy whatever beef is a low cost that day.  In this case, it was stew meat, cut and ready to go.  Sometimes it's a bigger cut, and I just cube it myself.  Just don't use anything too thin cut.  Hearty bites is the way to go here.

I scooched the onions to the outer edge of the pot, and dropped the meat in to brown.  Once it had some color on it, I de-glazed with beer.  It's Irish stew.  Of course it was Guinness.  I didn't stray THAT far from the original recipe.  In went half of my stock and some water, garlic, marjoram and thyme, and then on went the lid.

You could pop it in the oven at this point, but it's been too hot for me to have an oven running, so I simply reduced it to a low simmer.  I asked my husband to keep half an eye on it, then went to nap for an hour.  What can I say, it was a long work day, and supper was already cooking itself.  I indulged.


Upon waking, feeling much better, I got to work on the potatoes and carrots.  Four large potatoes and four large carrots will yield you a mini mountain of veggies.  


I dumped them in the pot, then added the other half of my stock to cover.  I should probably mention that the way I made it this time yielded more of a broth than a typical thick stew consistency.  You could easily fix this by dusting the meat with some flour before browning, or adding in some starch at this point.  I wasn't all that concerned about it being thick.  The broth was so rich and flavorful, I didn't miss the gravy consistency.  Anyways, once it came back up to a bubble, I reduced the heat to a simmer again, put the lid on, and left it for about half an hour.  The veggies were nice and tender, as was the meat.  Time to dig in.


Yum!  After having the scent wafting through the house for a couple of hours, it was so satisfying to finally chow down.  So far, we've gotten six (probably too) large portions out of it, and there are still leftovers for tomorrow.  The only thing I was missing from this was some crusty bread to sop up the liquids.  There's always next time though!

Irish Beef Stew

2 lbs Beef (approximately), cubed
2 Medium Sweet Onions, diced
1 11 oz Bottle Dark Beer (Guinness suggested)
32 oz Beef Broth, divided
2 cups Water
1.5 tsp Minced Garlic
1/2 tsp Marjoram
1 tsp Thyme
4 Large Potatoes, cubed
4 Large Carrots, cubed

1. In a dutch oven, saute onions on medium to medium high heat until they begin to soften.
2. Push onion to edges of pot, then add beef, browning on all sides.
3. Deglaze with beer.  Add half of beef broth and the water.  Stir in garlic, marjoram, and thyme.  Cover and simmer on low heat for an hour and a half.
4. Add potatoes and carrots.  Add remaining beef broth (and additional water if necessary) to cover vegetables.  Bring up to boil.  Cover and reduce to low heat, simmering for 30 minutes.
5. Stew is done once vegetables are fork tender.  Serve and enjoy!

Monday, August 3, 2015

Recipe: Inside Out Stuffed Peppers


So let me tell you something.  For most of my life, I've been a picky eater.  Very picky.  As in, it's only been in the last five or so years that I've learned to like such things as tomatoes, peppers, jelly, boxed mac and cheese....yes, that picky.  Once I realized I liked peppers (a few months ago), I of course had to learn to make stuffed peppers.  

What drew me to stuffed peppers originally is how pretty they look.  What keeps me eating them is the fact that not only do they have awesome built in portion control (if I'm feeling serving size conscious), but they can be changed up.  Beef and rice, chicken and lentils.  I've seen Philly-cheese steak, and breakfast themed.  What was I craving for this batch?  Spinach and artichoke dip.  I figured I could do rice stuffing up this way and get my fix without the guilt of glutting on chips and dip.

Now, clearly this isn't actually a stuffed pepper.  That was my original intent when I bought ingredients.  But then I was bopping around on food sites, and saw a stuffed pepper casserole.  Mmm.  Stuffed pepper comfort food style?  Don't mind if I do.  I love a good rice dish after all.


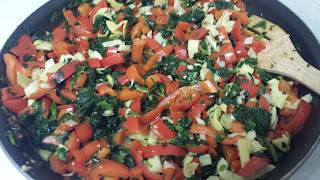
Since I was using brown rice, I got that started first.  I love how hearty it is, but it does take about an hour to be ready.  Then I got to work on the peppers.  As luck had it, they were on sale, three for a dollar.  I love it when sales happen to coincide with my meal plans.  I dumped the mass into the skillet, and let them cook down a little while I chopped artichokes.  I just use the canned ones.  Maybe one day I'll learn to prepare them fresh, but this day was not that day.


I added the artichokes, thawed frozen spinach, and garlic into the peppers.  Then I uttered a profuse thanks to my parents for buying me a giant skillet.  They're great at enabling my need to cook.  


For a lighter dish, I might have added the veggies to the rice as is.  But I had spinach and artichoke dip on my mind.  There would be no yielding.  In went cream cheese, milk, and shredded cheese, along with some chili powder.  I used Colby Jack for this dip, but you could use a number of different melting cheeses like Gruyere or Mozzarella.  I stirred, trying not to drool as it melted into thick, saucy goodness.


Parmesan to finish it.  You're probably going to notice I love Parmesan as we go.  I go through tons of the stuff.  It has been declared a food group in my household.  I could probably write a blog devoted strictly to Parmesan.  But that would just be giving myself excuses to eat even more of the stuff.  I need to draw the line somewhere...


All blended together, I added it into the rice.  Slowly and carefully.  I seem to have a knack for spilling when pouring from that giant pan.  But I managed this time to not lose any.  The end result: a vat of spinach and artichoke themed inside out stuffed peppers.


It was delicious, not to mention hearty and filling.  Being just my husband and I, we ate it all week.  I got ten generous portions out of it.  I imagine a family of four, eating it as a side along with a protein, could get three to four night's worth of meals easily.  I'm thinking maybe some skillet steaks or grilled chicken next time I make it.

Now, just with a rough calculation, this cost me between ten and fifteen dollars.  That's less then two bucks a serving.  I can't get fast food this cheap and delicious.  And even though the initial job took a tad over an hour, my dinner time cooking for the next few days was done.  Just a quick spin in the microwave, and dinner was served.  By the way, this was actually better the next day.  I love dishes that are even better as leftovers.

So here's the recipe

Inside Out Stuffed Peppers: Spinach and Artichoke Dip Style

2.5 cups Brown Rice
5 Medium Bell Peppers (diced)
16 oz Bag Frozen Spinach (thawed)
14.5 oz Can of Artichoke Hearts (diced)
8 oz Package of Cream Cheese (softened)
1 cup Milk
1 cup Shredded Colby Jack Cheese
1/2 cup Parmesan (grated)
5 tsp Minced Garlic
2 tsp Chili Powder

1. Prepare rice according to package directions.
2. Saute bell peppers on medium heat until they have softened.  Stir in spinach, artichokes, and garlic.
3. Dividing into chunks, add cream cheese.  Allow heat to begin melting, then add milk.  Stir until cream cheese has melted into mixture.
4.  Add shredded cheese and chili powder.  Stir until combined and smooth.  Stir in Parmesan.
5. Add mixture to rice in large pot or bowl.  Stir to combine.  Serve and enjoy!