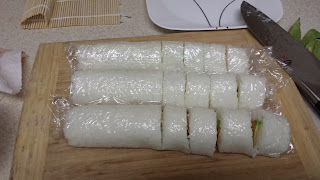
More recently though, I found myself wanting to try it again. Mostly because my husband enjoys it, meaning we find ourselves at sushi establishments from time to time. And though I have found more things to eat, I can't help but feel drawn to sushi. It's got so much visual appeal.
But some problems still remain. Raw fish. Tuna and salmon aren't too bad, but I really shouldn't eat it to often for dietary reasons. Nori. I can selectively manage it, but seaweed still just isn't my thing. Also, price. It can get expensive quickly.
So how to solve these issues? Why, make it myself of course. I can pick my fillings, eliminate the nori, and save quite a bit a money. I did the math at one point, comparing the price of my ingredients for an equivalent role. It was about a third of the price. Bingo.
So, once the raw fish is eliminated, sushi is pretty simple to make. Gather your rice and fillings, grab your roller and some plastic wrap, and grab some water with a splash of rice vinegar, and you're ready.
First, rice. Sushi rice. I have a Japanese market nearby. I went in, asked what they recommended, and went on my way. Now preparing sushi rice is much like preparing regular rice. You don't need a steamer. You do need to rinse the rice thoroughly, let it soak, use the right ratios, and let it cool to room temperature.
Now for the rice recipe, on Youtube there is this awesome channel. JapaneseCooking101 has a simple sushi rice recipe. However, I have some added tips learned through trial and error. First, when you soak the rice, despite what some websites might say, I wouldn't soak it any more than an hour. It leads to mushy rice. Thirty minutes is best.
Second when cooling it, do NOT put it in the refrigerator to speed up the process. This will cause condensation, which is not good for sushi. Fan it when you remove it from the pot, stir it once in a while to release additional heat, and if you really want cooling to go more quickly, point a fan at it.
So once cooled, it's time to lay it out. Since I'm skipping the nori, I use a sheet of plastic wrap on top of my roller for forming. Press it into a rectangle, making it a little more than a quarter inch thick.
Next, fillings. I've used cucumber, avocado, grilled chicken, steak, cream cheese. This round was avocado and sweet potato. Cut your filling into thin strips, and place on the rice as seen above.
Time to roll. It takes a little practice, but it's not too difficult. Starting with fewer fillings helps. Use your fingers to hold it in place as you start the roll. Make sure you pull away the plastic wrap after you start it so it doesn't end up included in the roll. There are many videos on rolling. Watching a couple will give you a good idea on technique.
Once rolled, slice it up. This is probably the trickiest part just because the rice tends to stick to the knife. I use a towel soaked with rice vinegar to clean it in between cuts.
 |
| Packed up for lunch at work! |


No comments:
Post a Comment