Monday, October 19, 2015

Lunch Box: Tomato Sandwich


I don't eat sandwiches very often.  But every now and then, I get the urge to stuff some sort of goodness between a couple slices of bread.  My husband had brought up sandwiches, and I was trying to decide what to stick in them.  While in the produce department, I caught a whiff of tomato and knew exactly what I wanted to do.

These sandwiches are pretty simple compared to the normal stacked concoctions I usually make, but the flavor is big enough that it makes up for it.  I took some bakery bread (sour dough is my favorite), slathered one slice with pesto, the other with goat cheese, and then added a couple thick slices of tomato.

So much flavor with so few ingredients.  Even my husband was happy to leave off his usual mayo.  He hates a 'dry' sandwich, but the juicy tomato took care of that.

You can easily replace the goat cheese with cream cheese.  I love the tang of the former, but I must admit it's a little pricey.  I was giving myself a treat this time given that I had pesto in the fridge and the tomatoes were a great price.  I promise the cream cheese is quite delicious if you aren't up to the splurge, though.

I wrapped them in parchment paper and packed them with grapes and crackers.  An easy and delicious lunch to keep one chugging along through their day!

Friday, October 9, 2015

Recipe: Peanut Butter Popcorn

My husband loves popcorn.  I like it all right.  We got a stove top popper last Christmas (thanks Mom and Dad!), and I've started eating it more often.  It's more work than putting a bag into the microwave, but waaaay better tasting.  We have a variety of salts and seasonings we put on it.


My husband was craving popcorn and a movie the other night, but I just wasn't feeling our usual salty selections.  And the caramel salt topping we got...eh.  I wanted some sort of sweetness drizzled over the top, but I have yet to really get the hang of making caramel.  So what to do?

Peanut butter sauce.  I just grabbed a little pot and threw some sugar, peanut butter, a splash of milk and a pat of butter in, let it melt together, and drizzled it over the pop corn.  Quick and delicious.  Actually, some of the most satisfying popcorn I've had in a while.  My husband gave it his stamp of approval, so I think this will be gracing movie night more often.

Recipe:
1/4 cup brown sugar
1/3 cup peanut butter
1 tbsp butter
1 tbsp milk

Bowl of unbuttered and unsalted popcorn (1/4 cup kernels, popped on stove top)

1. Melt butter and sugar together over medium heat, stirring constantly.
2. Add peanut butter and milk.  Continue to stir until ingredients are blended and peanut butter is runny.
3. Pour immediately over popcorn.  Toss to coat.
4. Kick back with movie, and enjoy!

Tuesday, October 6, 2015

Recipe: Halloween Rice

I've been wanting to try black rice for a while, and with Halloween on my mind, I thought I'd make a dish revolving around Halloween colors.  Also pumpkin.  Like I mentioned in my tomato soup recipe, I like finding ways to use it in savory dishes.  


It didn't turn out quite how I expected visually, but the taste was fantastic.  Since I plan on making it again, I'll probably come back and either edit this post with my tweaks, or do a 2.0 update.  Either way, I'll walk you through what I actually did, and what I would have done differently.


I chopped up an onion and a pepper for the base of my rice dish.  I started with the onions.  As I've explained before, onions haven't been my friend, and I can't do them if they aren't completely softened in the dish.  I let them start getting golden before I added the peppers.  Now, looking back, I shouldn't have added the peppers at all.  Just let the onions get to your desired level of softness, then add some garlic. 


Time to toss in the rice.  While white or brown rice might be cheaper, I got a one pound bag of the black rice for $2.90, so I think that's still a fair price.  Not a big impact on the wallet, but a huge impact on the dish.  Originally I thought to cook this risotto style, but I didn't feel like standing over the stove.  How I finished it off gets it pretty close feeling to that anyways, so I'm glad I saved myself the energy.


I used a 1:2 rice to liquid ratio.  If you were just eating the black rice plain, it would be a little wet, but the extra liquid is perfect for this dish.  I used beef stock to amp up the flavor, but you could use any type of broth you like.  I added my herbs, brought to boil, then covered it and lowered the heat.  Once done cooking, I turned off the burner to let it rest.  This is the point you'd want to saute the peppers in a separate pan...


...and add them when the rice is done resting.  That way you won't cook out the color like I did.  Live and learn.  Anyways, at this point I also added black beans, peas, pumpkin, and shredded cheese.  It's kinda ugly, but that doesn't bother me much.  I think having the peppers stay properly orange will give it more appeal.  Like I said, I'll let you know when I do a second round.


Even if it doesn't look pretty, the smell and taste was delicious.  The wild rice definitely seems to be heartier than the white rice I usually get.  I didn't serve up as much as I usually would, but I still felt plenty full by the time I was done scraping the bowl clean.  I recommend this to anyone who wants to do something different than the typical theme food seen at Halloween parties and potlucks.  Or who wants to make it just 'cuz.  

Recipe:

1 Onion
1 Bell Pepper (orange)
1 1/2 tsp Garlic
1 1/2 cups Black Rice
3 Cups Beef Stock
1 tsp Marjoram
1 tsp Celery Salt
1/2 tsp Thyme
1 15 oz can Pumpkin Puree
1 cup Peas (frozen)
1 15 oz can Black Beans (drained and rinsed)
3/4 cup Shredded Cheddar Cheese
1/4 cup Parmesan Cheese
Salt and Pepper to taste

1. Dice bell pepper and onion.  Set aside pepper.
2. Saute onion on medium heat until soft.  Add garlic.
3.  Add rice, broth, marjoram, celery salt, thyme, salt and pepper.  Bring to boil, cover and reduce heat to low.  Cook for 30 minutes.
4.  Remove rice from heat.  In a separate pan, saute bell pepper until tender.  Add to rice along with pumpkin puree, peas, black beans, and cheeses.  Stir well, add additional salt and pepper to taste.
5. Enjoy!

Sunday, October 4, 2015

Recipe: Caramel Dutch Apple Pie

I was never much of a cooked fruit eater growing up.  Whether it was jelly, pie, or sauce, I just wasn't interested.  I liked my fruit fresh.  Over all, that's still my preference, but I've come to enjoy fruit in a larger variety of ways.


Now that Fall is here, I'm feeling the need to make fall type stuff.  With apples on prominent display at the grocery store, I decided to try my hand at making apple pie.  I only started eating it about a year ago.  My parents live close to an orchard, and the town that keeps it has a few pie shops.  They bought us some pie while we were visiting, and I was finally converted.


I decided to go Dutch with this pie.  It's like the best of both a pie and a crisp.  Flaky crust, delicious crumble.  I started by making a slightly altered version of my mom's pie crust.  I substituted the shortening for coconut oil (chilled) and a couple tablespoons of butter.  A little sugar and a dash of cinnamon to play up the fact it's being used for a sweet pie.  I popped it in the fridge while I got down to business.


While prepping the fruit is probably usually the most time consuming, I recently acquired my mom's...apple...whirly...thing.  The peeler-cutter?  It's cool even if I don't know what it's called, alright?  Pop on an apple...


...and crank it.  It took a couple tries before I remembered the little tips and tricks to using it, but once done right, you end up with a lovely spiral of peeled, cored, and sliced apple.  Simply break it apart, and it's ready to use.


I tossed the apples in sugar, both white and brown, cinnamon, and cloves.  I should probably mention I personally used Red Delicious.  I like their sweetness.  Others like tart apples.  Use whatever apples you like best, in my opinion.


Once in the shell, I added some caramel.  Now, I meant to grab a jar of sauce to simply scoop over, but since I forgot it and didn't want to walk all the way over to get it, I just grabbed some cubes that were near the registers.  I used about ten, pulling them apart to distribute them over the pie.


Time for the crumble.  While browsing recipes, I noticed most recipes just use a traditional crumble of flour, sugar, and butter.  While I'm sure that's perfectly delicious, I wanted something more.  So I substituted some of the flour for oats.  I love the texture it adds.  I poured it over the top, placed the pie on a pan with foil, and popped it in the oven.


Let me just say, the smell while it was cooking was both divine and torture.  I think my favorite moment of cooking something in the oven is when you open the door when it's done, and that big waft of scented, warm air rushes out.  Mmm.  A little browned, and bubbly at the edges, I knew it was ready to come out.  This is always the real test of patience: letting it cool.


But the reward for waiting?  So well worth it.  Unfortunately, I will probably never serve up a perfect looking piece of pie, but as long as it tastes amazing, who cares?  A scoop of ice cream, and the warmth had it melting into it.  I love a la mode.  Sweet apples and caramel.  A zing of spice from the cinnamon and cloves.  It was delicious.

Perhaps I'll have a slice for breakfast instead of waiting for more dessert...

Recipe
Preheat oven to 375.

Pie Crust (use store bought if you prefer):
2 cups Flour
2/3 cups Shortening OR Coconut Oil (chilled)
(optional if using coconut oil) 2 tbsp Butter
1 tsp Salt
2 tsp sugar
dash of Cinnamon
6-9 tbsp cold water

1. Sift together dry ingredients.
2. Cut in shortening or coconut oil.  Texture should be small crumbles.
3. Add water and knead until dough just sticks together enough to form a ball.
4. Roll out and place in pie pan.  Crimp edges.  Chill while making apple filling.  

Apple Filling
5 medium large Apples (Mine came to 2.4 pounds when weighed at the grocery store)
1 1/2 tsp Vanilla Extract
1/2 cup Sugar
1/4 cup Brown Sugar
3 tbsp Flour
1 1/2 tsp Cinnamon
1/2 tsp Cloves
1/2 cup Caramel sauce OR 10 Caramel cube candies, pulled apart.

1. Peel and cut up apples.  Place in large bowl.  Add vanilla extract, and toss.
2. In a separate bowl, mix both sugars, flour, cinnamon, and cloves.
3. Pour mixture over apples, and toss to coat evenly.
4. Put apple mixture into pie crust.  Distribute caramel evenly over the top.

Crumble Topping
1/2 cup Flour
1/2 cup Oats
1/3 cup Butter, partially softened
1/4 cup Sugar
1/4 cup Brown Sugar
1 tsp Cinnamon
1 dash Cloves

1. In medium bowl, sift together dry ingredients.
2. Cut in butter to form crumbly texture.  (I used my hands to work it into the dry ingredients)
3. Distribute mixture evenly over pie filling.
4. Place pie on foil lined cookie sheet, then bake in oven for about 40-50 minutes.
5. Let cool, and enjoy!

Tuesday, September 29, 2015

Recipe: Tomato Pumpkin Soup


Despite highs still clinging to the 90's, the sight of Halloween and Fall decor everywhere, along with the amazing harvest super moon, has got me in the spirit of the season.  I love Autumn.  Hands down my favorite season.  And while I'm not opposed to eating soup even when it's blazing in the 100's, it just is that much better when at least the thought of cooler weather is at hand.  Eventually I'll make it further North and enjoy true Autumn, colored leaves and all, but until then I'll just think happy, cool, crisp thoughts.

So Fall typically means pumpkin recipes.  I love pumpkin recipes, but that usually means desserts, and I'm trying to behave somewhat.  Save up my calories for the revelries to come, if you will.  However, in the last couple years I've found I can add pumpkin to some different savory dishes with excellent results.  While you don't really taste the pumpkin in some of them, it gives an added heartiness that keeps me feeling fuller than I might have otherwise.


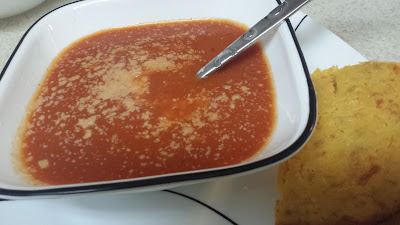
This time, I thought I'd put it in soup.  Tomato soup.  I only started liking the stuff recently, and  never out of a can.  Canned stuff tastes like ketchup to me, and I really, really dislike ketchup.  This is more akin to pasta sauce turned soup.  With pesto as the prime seasoning, this soup was rich and filling without the calories that creamy soups tend to have.  I served it up with some cornbread, and it was excellent.

Now, as far as ingredients go, I just use canned.  I haven't reached the point of making my own tomato sauce yet, but maybe eventually.  It would definitely kick this recipe up a notch, but the nice thing about canned is it's cheap and convenient.  The special ingredient, pesto, is probably the biggest investment (which is still only a couple bucks), but you only need a little, and can use the rest as either a sauce as intended, or to flavor other recipes.  I love having it around.

The best part of this recipe isn't even how ridiculously cheap it is to make.  It's the ease and speed of it's creation.  It's ready to eat in less than 20 minutes, and can sit at a low heat for a while if need be.  I just turned my burner to the lowest I could and let it sit while cornbread cooked.  Here's the recipe:

2 29 oz cans Tomato Sauce (+1 can full of water)
1 15 oz can Pumpkin Puree
1 cup Milk
1 1/2 tbsp Pesto
1/2 tsp Celery Salt
1/2 tsp Sage
Salt and Pepper to taste

Put all ingredients in a large pot, and bring to a simmer on medium high heat.  Reduce heat to medium low, and allow to simmer for 10 to 15 minutes.  Serve and enjoy.

Wednesday, September 2, 2015

Lunch Box: Combo 1

So it's been a bit since I posted.  To be honest, food has been whatever can be made quickly and simply by me, or made by my husband.  I've been working on a big project, and cooking got put on the back burner.  Lunches in particular have suffered, so this week I made a point in fixing that.

I thought it was a good topic for posts.  Lunches that could be assembled fairly easily and quickly, but still at least fairly healthy and quite delicious.  I hear so many people saying that they don't have time to do packed lunches, but is that really true?  With some simple prep work, making lunches doesn't take much time at all.  It took me less than ten minutes to assemble two of the lunches below.


Half a large peach, cottage cheese, and a BLT wrap.  By washing produce and cooking bacon ahead of time, the only thing I need to do is put everything in a tortilla and wrap it up.  A quick slicing for the peach, and a couple scoops of cottage cheese, and you have a very satisfying lunch.

Now don't get me wrong, sometimes I toss a can of something or a power bar into a bag, and call it a day, but this is way better.  Healthier and more filling than vending machine snacks, and cheaper than the cost of driving to grab fast food.  So for those who want a meal that can be brought on the go which will sate both appetite and wallet, keep an eye out for more lunch combos in the future!


Friday, August 14, 2015

Picky Eater Sushi

Sushi.  I first tried it in high school.  After getting me on the anime bandwagon, a couple of friends brought me out to try it.  It...did not go well.  I found a roll that didn't involve raw fish, but then I discovered that the nori it was wrapped in...well, seaweed just wasn't for me.  So I put it in my 'tried it' bucket and stuck to rice and miso soup whenever I found myself on future sushi outings.

More recently though, I found myself wanting to try it again.  Mostly because my husband enjoys it, meaning we find ourselves at sushi establishments from time to time.  And though I have found more things to eat, I can't help but feel drawn to sushi.  It's got so much visual appeal.

But some problems still remain.  Raw fish.  Tuna and salmon aren't too bad, but I really shouldn't eat it to often for dietary reasons.  Nori.  I can selectively manage it, but seaweed still just isn't my thing.  Also, price.  It can get expensive quickly.

So how to solve these issues?  Why, make it myself of course.  I can pick my fillings, eliminate the nori, and save quite a bit a money.  I did the math at one point, comparing the price of my ingredients for an equivalent role.  It was about a third of the price.  Bingo.


So, once the raw fish is eliminated, sushi is pretty simple to make.  Gather your rice and fillings, grab your roller and some plastic wrap, and grab some water with a splash of rice vinegar, and you're ready.


First, rice.  Sushi rice.  I have a Japanese market nearby.  I went in, asked what they recommended, and went on my way.  Now preparing sushi rice is much like preparing regular rice.  You don't need a steamer.  You do need to rinse the rice thoroughly, let it soak, use the right ratios, and let it cool to room temperature.

Now for the rice recipe, on Youtube there is this awesome channel.  JapaneseCooking101 has a simple sushi rice recipe.  However, I have some added tips learned through trial and error.  First, when you soak the rice, despite what some websites might say, I wouldn't soak it any more than an hour.  It leads to mushy rice.  Thirty minutes is best.  

Second when cooling it, do NOT put it in the refrigerator to speed up the process.  This will cause condensation, which is not good for sushi.  Fan it when you remove it from the pot, stir it once in a while to release additional heat, and if you really want cooling to go more quickly, point a fan at it.

So once cooled, it's time to lay it out.  Since I'm skipping the nori, I use a sheet of plastic wrap on top of my roller for forming.  Press it into a rectangle, making it a little more than a quarter inch thick.


Next, fillings.  I've used cucumber, avocado, grilled chicken, steak, cream cheese.  This round was avocado and sweet potato.  Cut your filling into thin strips, and place on the rice as seen above.


Time to roll.  It takes a little practice, but it's not too difficult.  Starting with fewer fillings helps.  Use your fingers to hold it in place as you start the roll.  Make sure you pull away the plastic wrap after you start it so it doesn't end up included in the roll.  There are many videos on rolling.  Watching a couple will give you a good idea on technique.


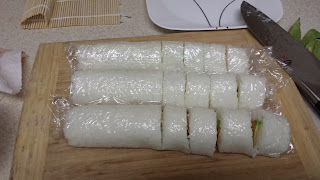
Once rolled, slice it up.  This is probably the trickiest part just because the rice tends to stick to the knife.  I use a towel soaked with rice vinegar to clean it in between cuts.

Packed up for lunch at work!

Finally, enjoy!